Howdy, Stranger!
We are about to switch to a new forum software. Until then we have removed the registration on this forum.
Categories
- All Categories 25.7K
- Announcements & Guidelines 13
- Common Questions 30
- Using Processing 22.1K
- Programming Questions 12.2K
- Questions about Code 6.4K
- How To... 4.2K
- Hello Processing 72
- GLSL / Shaders 292
- Library Questions 4K
- Hardware, Integration & Other Languages 2.7K
- Kinect 668
- Arduino 1K
- Raspberry PI 188
- Questions about Modes 2K
- Android Mode 1.3K
- JavaScript Mode 413
- Python Mode 205
- Questions about Tools 100
- Espanol 5
- Developing Processing 548
- Create & Announce Libraries 211
- Create & Announce Modes 19
- Create & Announce Tools 29
- Summer of Code 2018 93
- Rails Girls Summer of Code 2017 3
- Summer of Code 2017 49
- Summer of Code 2016 4
- Summer of Code 2015 40
- Summer of Code 2014 22
- p5.js 1.6K
- p5.js Programming Questions 947
- p5.js Library Questions 315
- p5.js Development Questions 31
- General 1.4K
- Events & Opportunities 288
- General Discussion 365
In this Discussion
- byronqually October 2014
Override PIR hardware HIGH timeout with Processing code
Hi all
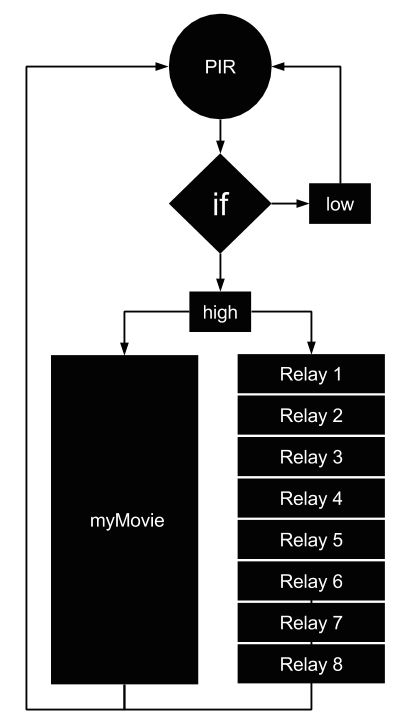
I am working with a Processing + Arduino + PIR + Relay setup to trigger a video and lighting display sequence. A basic schematic is on the image below and my code follows. Although the code is 99% working, I have to keep on activating the motion sensor to view the complete movie sequence.
Is there a code line to keep the PIR HIGH for the duration of the ten minute video?
Many thanks Byron

// MY SETUP //
/* Apple OSX Version 10.9.5, Java 7.67, Processing 2.2.1, Arduino Uno, Relay board 8CH 5V, PIR sensor */

// LIBRARIES TO IMPORT //
import processing.serial.*;
import cc.arduino.*;
import processing.video.*;

// GLOBAL VARIABLES //
Arduino arduino; // Variable for Arduino
Movie myMovie; // Variable for movie
int pirPin = 2; // Variable for PIR
int pinRelay1 = 3; // Variable for Godly Column relay
int pinRelay2 = 4; // Variable for Blue Gradient relay
int pinRelay3 = 5; // Variable for Magic Magnet relay
int pinRelay4 = 6; // Variable for Hula Hoops relay
int pinRelay5 = 7; // Variable for Silicone Landscape relay
int pinRelay6 = 8; // Variable for Ceiling Lamp relay
int pinRelay7 = 9; // Variable for Laughing Lights relay
int pinRelay8 = 10; // Variable for UV Light relay
int ledPin = 13; // Variable to show PIR motion detected
int calibrationTime = 5; // Variable for PIR to calibrate
int time = millis(); // Variable for time
int seconds = 0; // Variable for seconds
int lastmiltime = 0;

// INITIAL ENVIRONMENT PROPERTIES //
void setup() {
  arduino = new Arduino(this, "/dev/tty.usbmodemfd111", 57600); // Declares Arduino serial sport
  print(" Calibrating "); // Prints to console area
  for(int i = 0; i < calibrationTime; i++){ // Declares sensor time to calibrate
      print("."); // Prints to console area
      delay(1000); // Delay everything for 1 second
  }
  print(" calibrated "); // Prints to console area
  arduino.pinMode(pirPin, arduino.INPUT); // Declares PIR sensor as Arduino input
  arduino.pinMode(ledPin, arduino.OUTPUT); // Declares LED as an Arduino output
  arduino.pinMode(pinRelay1, arduino.OUTPUT); // Declares Relay1 as an Arduino output
  arduino.pinMode(pinRelay2, arduino.OUTPUT); // Declares Relay2 as an Arduino output
  arduino.pinMode(pinRelay3, arduino.OUTPUT); // Declares Relay3 as an Arduino output
  arduino.pinMode(pinRelay4, arduino.OUTPUT); // Declares Relay4 as an Arduino output
  arduino.pinMode(pinRelay5, arduino.OUTPUT); // Declares Relay5 as an Arduino output
  arduino.pinMode(pinRelay6, arduino.OUTPUT); // Declares Relay6 as an Arduino output
  arduino.pinMode(pinRelay7, arduino.OUTPUT); // Declares Relay7 as an Arduino output
  arduino.pinMode(pinRelay8, arduino.OUTPUT); // Declares Relay8 as an Arduino output
  size(320, 180); // Declares size of sketch
  myMovie = new Movie(this, "timer.mov"); // Declares movie file name
}

//CODE TO CONTINUOUSLY EXECUTE //
void draw() {
  if(arduino.digitalRead(pirPin) == arduino.HIGH) { // If motion is detected
    if (millis()-lastmiltime>1000) {
      seconds++;
      lastmiltime = millis();
      }
    if (seconds > time + 1) {
      myMovie.play(); // Play movie once
      image(myMovie, 0, 0, 320, 180); // Position and scale movie
      }
    if (seconds > time + 1) {
      arduino.digitalWrite(pinRelay1, arduino.HIGH); // Turn Relay1 on
      }
    if (seconds > time + 10) {
      arduino.digitalWrite(pinRelay1, arduino.LOW); // Turn Relay1 off
      }
    if (seconds > time + 3) {
      arduino.digitalWrite(pinRelay2, arduino.HIGH); // Turn Relay2 on
       }
    if (seconds > time + 4) {
      arduino.digitalWrite(pinRelay2, arduino.LOW); // Turn Relay2 off
       }
    if (seconds > time + 5) {
      arduino.digitalWrite(pinRelay3, arduino.HIGH); // Turn Relay3 on
       }
    if (seconds > time + 6) {
      arduino.digitalWrite(pinRelay3, arduino.LOW); // Turn Relay3 off
       }
    if (seconds > time + 7) {
      arduino.digitalWrite(pinRelay4, arduino.HIGH); // Turn Relay4 on
       }
    if (seconds > time + 8) {
      arduino.digitalWrite(pinRelay4, arduino.LOW); // Turn Relay4 off
       }
    if (seconds > time + 9) {
       arduino.digitalWrite(pinRelay5, arduino.HIGH); // Turn Relay5 on
       }
    if (seconds > time + 10) {
       arduino.digitalWrite(pinRelay5, arduino.LOW); // Turn Relay5 off
       }
    if (seconds > time + 11) {
       arduino.digitalWrite(pinRelay6, arduino.HIGH); // Turn Relay6 on
       }
    if (seconds > time + 12) {
       arduino.digitalWrite(pinRelay6, arduino.LOW); // Turn Relay6 off
       }
     if (seconds > time + 13) {
      arduino.digitalWrite(pinRelay7, arduino.HIGH); // Turn Relay7 on
       }
     if (seconds > time + 14) {
      arduino.digitalWrite(pinRelay7, arduino.LOW); // Turn Relay7 off
      }
     if (seconds > time + 15) {
      arduino.digitalWrite(pinRelay8, arduino.HIGH); // Turn Relay8 on
      }
     if (seconds > time + 16) {
       arduino.digitalWrite(pinRelay8, arduino.LOW); // Turn Relay8 off
       }
  }
  if (arduino.digitalRead(pirPin) == arduino.LOW) {
    print("."); // Prints to console area
    }
}

// CALLED EVERY TIME A NEW FRAME IS AVAILABLE //
void movieEvent(Movie m) {
  m.read(); // Not sure if this is needed
}

Answers
Many thanks to Robin Gilham based in Cape Town for helping me with the question above. To resolve the PIR hardware calibration, 'switch' control code is required. The code has been updated below and the key Processing links are http://processing.org/reference/switch.html and http://processing.org/reference/increment.html