Howdy, Stranger!
We are about to switch to a new forum software. Until then we have removed the registration on this forum.
Categories
- All Categories 25.7K
- Announcements & Guidelines 13
- Common Questions 30
- Using Processing 22.1K
- Programming Questions 12.2K
- Questions about Code 6.4K
- How To... 4.2K
- Hello Processing 72
- GLSL / Shaders 292
- Library Questions 4K
- Hardware, Integration & Other Languages 2.7K
- Kinect 668
- Arduino 1K
- Raspberry PI 188
- Questions about Modes 2K
- Android Mode 1.3K
- JavaScript Mode 413
- Python Mode 205
- Questions about Tools 100
- Espanol 5
- Developing Processing 548
- Create & Announce Libraries 211
- Create & Announce Modes 19
- Create & Announce Tools 29
- Summer of Code 2018 93
- Rails Girls Summer of Code 2017 3
- Summer of Code 2017 49
- Summer of Code 2016 4
- Summer of Code 2015 40
- Summer of Code 2014 22
- p5.js 1.6K
- p5.js Programming Questions 947
- p5.js Library Questions 315
- p5.js Development Questions 31
- General 1.4K
- Events & Opportunities 288
- General Discussion 365
Working Dof example shared
HI
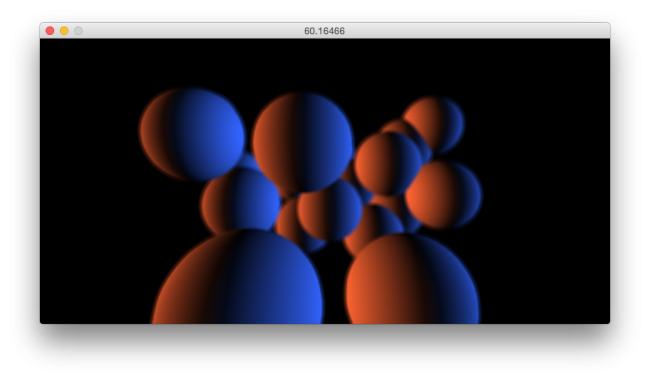
I shared a DOF working demo made with shaders for depth and blur.
I hope you enjoy this
https://github.com/edumo/P5PostProcessing
edumo.net
Tagged:

Comments
Awesome, thanks for sharing! ;)
thanks :)
Does dof mean depth of field?
Chrisir
Hi! Thanks for sharing but... is there a library missing?
I deleted all the imports and PDE X suggested to import remixlab.proscene.Scene; I did and now it complains That the constructor Scene(Dof, PGraphics) does not exist.
For which version of Processing / Proscene is the code meant?
Cheers
A version without the Proscene dependency would be great :)
Hi
thanks for the replys,
yes is Depth of Field based on this ofx library https://github.com/neilmendoza/ofxPostProcessing
I'm a proscene fan :), the DofManager doesn't have any dependency, if have any question integrating this effect maybe we can help.
Can you post a screenshot?
thanks for your answer!
Chrisir
I couldn't make it work with proscene, so I shared a version of your code without proscene at https://github.com/hamoid/P5PostProcessing :)
Also, by reusing a PShape sphere I get a much higher framerate than by calling sphere each time.
Thanks again for sharing it!
Nice improvements!
I hope to grow the examples
thanks!
thanks hamoid and edumo for sharing.
@hamoid i tried using your version as i do not need proscene. but i have a hard time controlling the focus. in the demo there doesn't seem to be a focus point at all. and i didn't manage to define one with the focus attribute.
in edumos version controlling the focus works perfectly.
@mschi Do you mean aiming the camera? or the changing the focus depth? Moving the mouse horizontally should set the focus depth. I guess the camera can be aimed using the standard Processing camera functions...
forget what i wrote. it was my bad. i used it the wrong way. now everything is nice. sorry :)
Here is an image from the one hamoid have setted on github:
Instead of the shape I used: pg.line((i7763)%width, (i777)%height, (i7763)%height, (i777)%width);
But for some reason the lines really flicker, why is that?
Hi,
we have ported this example into the upcoming proscene-3 version. The example is already packaged in the proscene-3.alpha2 pre-release. Don't forget to check also the new post-effects example which is nicer, and more powerful and general :)
Enjoy! and please don't forget that your feedback is more than welcome!
Does it work with lines now?
I didn't know it didn't. However, I tested it without any flickering issues by using
return createShape(LINE,0,0,60,60,60,60);instead ofreturn createShape(BOX, 60);. The scene axes lines didn't flicker either (they're drawn by the Scene withpg().beginShape(PApplet.LINES);). Here's the modified code:Thanks for the great example!
It would have been great if it had been possible to get both the color and the depth buffer after one render (as is usually the case with an FBO) -- here one has to render the same scene twice, once to get the depth, and once to get the colour.
Does anyone know if Processing will ever support multiple render targets, specifically for getting both colour and depth from a single render?