Howdy, Stranger!
We are about to switch to a new forum software. Until then we have removed the registration on this forum.
Categories
- All Categories 25.7K
- Announcements & Guidelines 13
- Common Questions 30
- Using Processing 22.1K
- Programming Questions 12.2K
- Questions about Code 6.4K
- How To... 4.2K
- Hello Processing 72
- GLSL / Shaders 292
- Library Questions 4K
- Hardware, Integration & Other Languages 2.7K
- Kinect 668
- Arduino 1K
- Raspberry PI 188
- Questions about Modes 2K
- Android Mode 1.3K
- JavaScript Mode 413
- Python Mode 205
- Questions about Tools 100
- Espanol 5
- Developing Processing 548
- Create & Announce Libraries 211
- Create & Announce Modes 19
- Create & Announce Tools 29
- Summer of Code 2018 93
- Rails Girls Summer of Code 2017 3
- Summer of Code 2017 49
- Summer of Code 2016 4
- Summer of Code 2015 40
- Summer of Code 2014 22
- p5.js 1.6K
- p5.js Programming Questions 947
- p5.js Library Questions 315
- p5.js Development Questions 31
- General 1.4K
- Events & Opportunities 288
- General Discussion 365
How to use video capture when developing in Eclipse
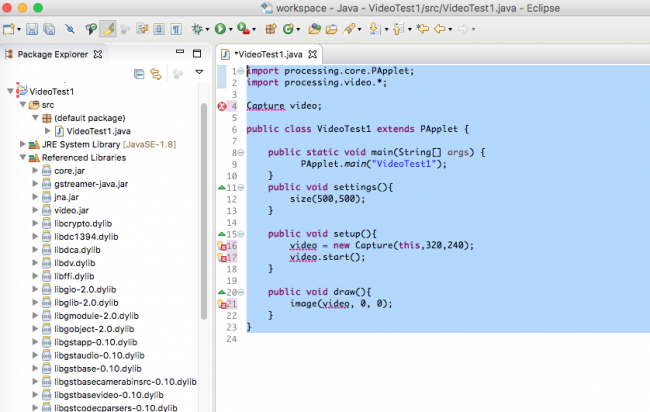
I want to develop a Java project using Eclipse that utilizes some Processing graphics elements and in particular video capture. The two Processing tutorials related to using video and using the Eclipse IDE are quite helpful but.. the problem appears to be how to import the video library into Eclipse. I've added the video library to my Processing 3.3 app and the simple example works correctly (and so do a number of other more complex codes using the Capture object and the Processing IDE). I've also successfully used Eclipse to write a number of codes that use the Processing .core jars (extend PApplet) and appear to have the Processing core correctly imported and the build paths set. I imported the .jar files from the added "video" libraries folder of the Processing,app as well as the ldylib files (based upon a recommendation in the Forum:
https://forum.processing.org/two/discussion/10034/#Comment_39007
Eclipse appears to recognize the presence of "processing.video.*" - see Eclipse "output" below but it doesn't recognize the presence of the Capture class in the library??
Suggestions from anyone who has used video capture (i.e. camera image capture on a Mac) would be appreciated.
`import processing.core.PApplet;
  import processing.video.*;

  Capture video;

   public class VideoTest1 extends PApplet {

public static void main(String[] args) {
      PApplet.main("VideoTest1");
}
public void settings(){
    size(500,500);
}

public void setup(){
    video = new Capture(this,320,240);
    video.start();
}

public void draw(){
    image(video, 0, 0);
}
} ` The error is associated with the Capture object.


Answers
So far in the 10 days this question has been posted, there have been 23 reads but not a single comment/suggestion.
Is that because the question is unclear or that no one has ever tried this or ...?
Any ideas/comments might help!
Ok, so I gave it a try.... You can find these instructions also in GitHub as the forum might shink the images: https://github.com/kfrajer/ProcessingVideoInEclipse
As a reference: https://processing.org/tutorials/eclipse/
I have Win10 64bit, P3.3.4 64bit and Eclipse Mars 2.0 This is what I did. Open the example video>>Capture>>BrightnessTracking
Run the sketch. It works for me. I get some warnings related to the GStreamer-CRITICAL... Notice you will get those warnings on the other side.
Now I did this: I exported the library and I didn't check the 64 bit part[STEP1.png]. This step will produce two folders. Check Export_BrightnessTracking_folderTree.txt
This will create two folders,one for the 32 and another for the 64 bit version. In my machine, I tried running the 32 version and it didn't execute as I didn't get any video. On the other hand, the executable in the 64 but folder worked [!!!]. So I will be using these files in the rest of the steps.
Now open eclipse and create a new Java Project which I named briBriBri (For a better name) [STEP2]:
In this new project, add a new class called BrightnessTracking [STEP3].No need to add main as it will be replaced in the next step.
Now, go back to the 64 bit export folder and search for the BrightnessTracking.java file. Open it with a text editor (or Processing) and copy the entire content and paste it in this new generated class. Make sure you preserve the first line of the class, the o one that makes reference to the name of your project's package. In my case:
package briBriBri;[STEP4] shows all those red lines... let's fix that.
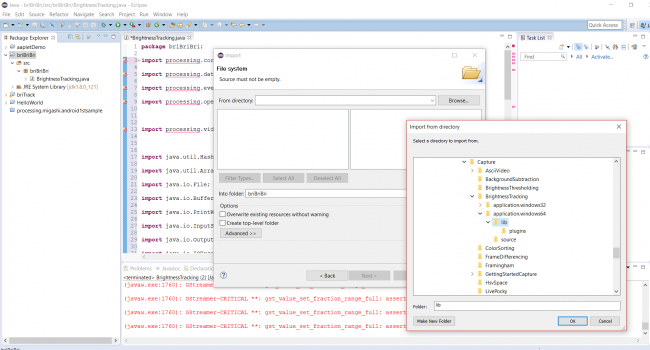
[STEP5 and STEP6] Right click on your project and click on import, then on the dialog box click File System:
In [STEP7] search for the location of the exported files that you get from step1. I decided to use library>>video>capture>BrigghtnessTracking>>application.windows64>>lib for reasons I commented above. Notice there is also a folder called plugins inside the lib folder.
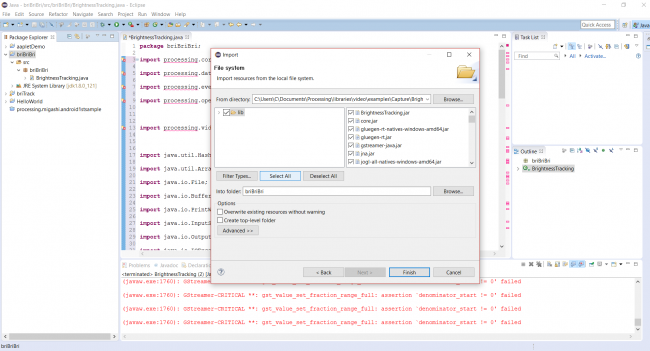
Then you are back on the previous dialog box Title Import and Importing: File System. It will populated with jar and dll files on the right box. [STEP8] Click select all:
Now, select all the jar files. Notice there is the video.jar file at the end of the list (It is not shown in the screen shot). Right click on the selection then select Build Path>> Add To Build Path [STEP9]
Step10 shows when I try running the code. Choose Java Applet and hit run.
Notice I got a warning shown in STEP11.png: ""Selection does not contain an Applet". Dismiss it:
Now you will get a bunch of warnings and the sketch should run. If it does not work, then go to Build >> Clean in the Eclipse's menu and try running again.
I attached an extra file showing the structure of the files and folders in the briBriBri project after i get everything running. The name of the file is Export_BrightnessTracking_folderTree.txt
I hope it works.
Kf
Ok... so i tried these other instructions and it also worked taking less steps: http://www.oxfordmathcenter.com/drupal7/node/44
Notice that when adding the jar files, I only added the jar file and I did not include the DLL files or the plugins folder which contains more DLL files. It didn't at first, so i had to do a Project>>Clean and then run it and voila.
Kf